This post contains affiliate links. If you make a purchase through these links, I earn a small commission at no extra cost to you.
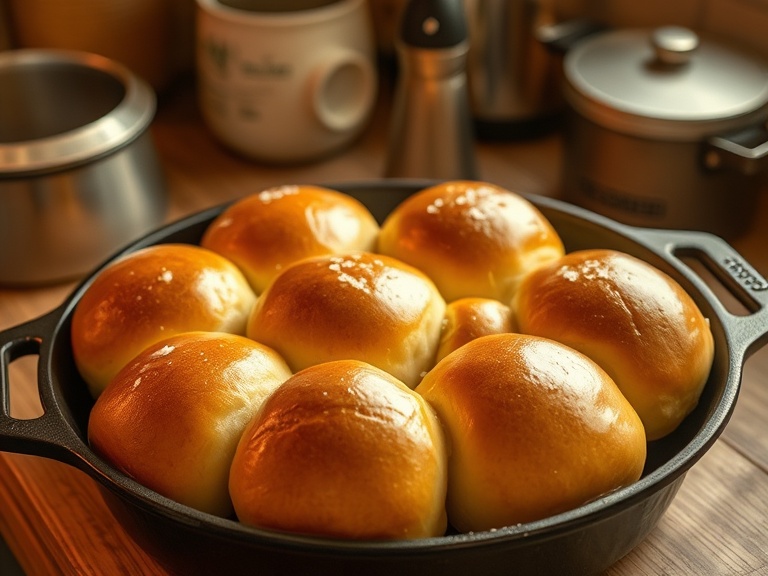
Nana Ruth made rolls the way she made everything — without a recipe written down. “Your hands will remember,” she’d say. These are her rolls, exactly as she taught me, just shaped for pulling instead of plating. Because she understood something about bread: it’s better when you break it together.
When I was Clara’s age, Nana Ruth taught me to make these rolls on Saturday mornings. No stand mixer, no fancy technique — just flour, yeast, time, and her hands showing me how. These days they’re trending as “pull-apart” rolls, but Nana Ruth’s rolls were always meant to be broken apart anyway. The update feels less like a trend and more like rediscovering what she already knew.
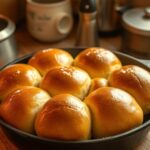
The boys will eat three of these without thinking. Jake comes home and eats them like they’re the finest thing he’s tasted. Clara wants to make them like Nana Ruth taught me. And when the whole table is gathered around warm rolls sitting in a bread basket, golden and steaming, I can feel Nana Ruth there too.
How to Make Nana Ruth’s Honey Butter Dinner Rolls
Warm your milk and dissolve the yeast. The milk should be about 110 degrees — warm but not hot. Stir in honey and yeast, then let it sit for five to ten minutes until it’s bubbly and active. The honey feeds the yeast and gives the rolls their subtle sweetness.
Mix and knead your dough. Combine the yeast mixture with melted butter, an egg, flour, and salt. Knead for about five minutes until the dough is smooth, soft, and slightly sticky — it should spring back when you poke it. Nana Ruth always said good roll dough feels like a baby’s cheek. Cover and let it rise in a warm spot for about an hour until doubled.
Shape, rise again, and bake. Punch down the dough, divide into 18-20 pieces, and roll each into a smooth ball. Arrange them close together in a buttered baking dish — this is what makes them pull-apart. Cover and let them rise another 30 minutes until puffy and touching. Bake at 375 degrees for 12 to 15 minutes until golden. Brush immediately with melted honey butter while they’re still hot.
If you love baking bread, my Pull-Apart Garlic Bread is another crowd-pleaser, and my Homemade Soft Pretzels are the ones my kids beg for on weekends. For a quick bread that goes with everything, try my Maggie’s Buttermilk Biscuits or my Hot Honey Skillet Cornbread.
Nana Ruth's Honey Butter Dinner Rolls
Ingredients
- 1 cup whole milk, warmed
- 2 1/2 teaspoons active dry yeast 1 packet
- 3 tablespoons granulated sugar
- 4 tablespoons butter, melted plus more for brushing
- 1 1/2 teaspoons salt
- 1 large egg
- 3 1/2 cups all-purpose flour may need more if humid
- 2 tablespoons honey for brushing, optional
Instructions
-
Activate the yeast: In a large bowl, combine warm milk (about 110F), yeast, and 1 tablespoon of sugar. Let sit 5 minutes until foamy.
-
Build the dough: Add remaining 2 tablespoons sugar, 3 tablespoons melted butter, salt, and egg. Stir well. Add flour a cup at a time until a shaggy dough forms.
-
Knead: Turn dough onto a lightly floured surface and knead 8-10 minutes until smooth, elastic, and springs back when poked.
-
First rise: Place in a greased bowl, cover with a damp towel. Let rise until doubled, about 45-60 minutes.
-
Shape: Divide dough into 18-20 equal pieces. Roll each into a ball and place in a buttered 9x13 baking pan. They should fit snugly but not be pressed.
-
Second rise: Cover with a towel and let rise 20-30 minutes until puffy and touching.
-
Bake: Preheat oven to 375F. Bake 12-15 minutes until golden brown on top.
-
Finish: Brush immediately with melted butter and drizzle with honey. Serve warm.
Common Questions
More Recipes You’ll Love
- Hot Honey Skillet Cornbread
- Pull-Apart Garlic Bread
- Old-Fashioned Hot Cross Buns
- Maggie’s Buttermilk Biscuits: The Saturday Morning That Brings Everyone Home
What I Use for This Recipe
A couple things from my kitchen that make this one easier.

The skillet that never leaves our stovetop. Pre-seasoned, affordable, and built to last.
Casseroles, brownies, brunch bakes. I own three and somehow always need a fourth.

No handles, more feel. Nana Ruth used one just like this. You can feel the dough better.
This post contains affiliate links. As an Amazon Associate, I earn from qualifying purchases at no extra cost to you. I only recommend tools I actually use. See all my kitchen picks