The Great Egg-Dyeing Debate: What I’ve Actually Learned
I grew up watching Nana Ruth dye eggs the way her mother taught her: vinegar, food coloring, patience. Then last year, I watched TikTok videos of marble eggs and ice-dyed masterpieces. Both are beautiful. Both have real tradeoffs. And honestly? I love that I know how to do both now, because some years I want reliable, and some years I want pretty.
This guide walks both paths honestly. Not to convince you one way is better. Just to show you what actually happens when you try each method—the truth about ease, the reality about mess, and what you end up with when it’s done.
Nana Ruth’s Method — The Traditional Vinegar Way
Nana Ruth never measured the vinegar. She’d say “enough so it smells sharp” and that was her recipe. Her eggs were always perfect—deep, rich colors that never faded, never cracked. Here’s what I learned about why that works.
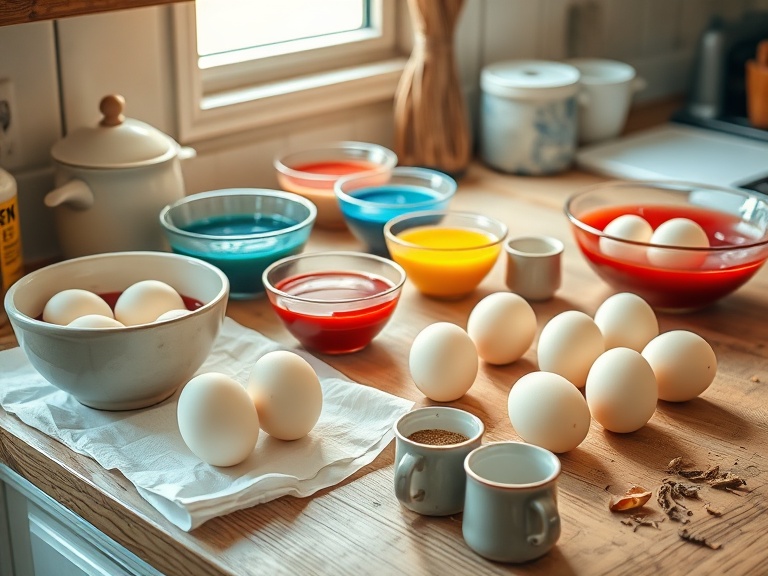
What you need:
- White vinegar (not apple cider—this matters)
- Food coloring (regular grocery store is fine)
- Hot water (not boiling, but truly hot)
- Small bowls or cups
- A spoon for each color
- Hard-boiled eggs (boiled, cooled, maybe cracked slightly—that’s intentional, not a mistake)
How it works:
Fill each cup about halfway with hot water. Add 1 teaspoon of white vinegar per cup. (That’s when the kitchen smells sharp—that’s when you know it’s ready.) Add 10-15 drops of food coloring to each cup. The deeper you want the color, the more drops you add. Gently place your eggs in the cups and let them sit. After about 5 minutes, you’ll see color beginning to creep in. After 10-15 minutes, you have eggs. If you want VERY deep color, leave them longer—I’ve gone 30 minutes for an almost-jewel tone.
The whole process takes maybe 20-30 minutes from start to finish. And here’s the beautiful part: it’s almost impossible to mess up.
Why it works every time: The vinegar opens the egg’s porous surface and helps the food coloring grip the shell. The hot water accelerates the process. The chemistry is simple and reliable. I’ve done this with three kids of various levels of coordination, and the eggs always came out colored, always looked good.
Pro tip from experience: Boil your eggs BEFORE dyeing (not day-of, the night before is fine). Let them cool completely. Slightly warm eggs take color unevenly. Cold eggs take it beautifully. And white vinegar (not apple cider, not balsamic) actually changes the color slightly—I learned this the hard way. Apple cider vinegar gives a muddy result. Stick with white.
Modern Trending Methods — Ice-Dye, Marble, Tie-Dye
These methods are beautiful. They’re also finicky. Here’s what you get and what it costs you.
Ice-Dye Eggs (The Watercolor Effect)
This is the trending method right now. You place an ice cube on top of a hard-boiled egg and sprinkle food coloring powder directly onto the ice. As it melts, the coloring runs down the egg in watercolor-like patterns. Theoretically: gorgeous. Practically?
The hardest part is getting your hands on food coloring powder (or grinding tablets into powder). Regular liquid food coloring doesn’t work the same way. And the melting ice is unpredictable. Sometimes you get beautiful color gradients. Sometimes the colors all run to one side and you end up with a lopsided masterpiece. Sometimes they barely take color at all.
Also: this requires a plate or tray to catch the melting ice water. That water is now dyed. Your hands, your counters, your clothes might be dyed too. Food coloring on cloth doesn’t come out. I learned that with Mason’s favorite shirt.
Marble Eggs (The Oil-Swirl Effect)
Fill a shallow dish with warm water. Add oil-based food coloring drops (harder to find—you need the oil-soluble kind, not the regular grocery store kind). Swirl the colors, then gently roll an egg through the mixture. The oil sticks to the egg’s surface and you get glossy, marbled colors. Sound easy? It’s not.
Regular food coloring is water-soluble, not oil-soluble, so it won’t work. You have to special-order oil-soluble coloring or find it at specialty baking shops. And the marbling? Unpredictable. Sometimes it creates beautiful swirls. Sometimes it creates blotches. And here’s the kicker: the oil coating can make the eggs slippery, so handling them requires care.
Also: oils don’t fully wash off. Your hands will feel slippery and smell faintly of food coloring oil for hours afterward. It’s not harmful, just weird.
Tie-Dye Eggs (The Rubber Band Effect)
Wrap rubber bands around raw eggs at various points, then boil them in dye-water. The rubber bands create patterns. When you remove the bands, you have white stripes against colored backgrounds. Simple idea. More complicated execution.
The problem: boiling raw eggs with rubber bands is awkward. You have to be careful the bands don’t slip. You have to manage boiling time so eggs cook all the way through while the dye takes. And the patterns are limited—just whatever shape the rubber band makes. Less “tie-dye masterpiece,” more “eggs with white stripes.”
Worth trying? Maybe. But it’s not a what really changed things.
Side-by-Side Comparison: The Honest Truth
| Method | Ease | Visual Results | Mess Level | Time | Forgiving? |
|---|---|---|---|---|---|
| Traditional (Nana Ruth) | Easy | Solid color, reliable | Low (maybe hands stain) | 20–30 min | Very forgiving |
| Ice-Dye | Moderate | Watercolor-pretty (unpredictable) | Moderate-high (water + dye) | 10–15 min per egg | Not really |
| Marble (Oil) | Hard (special supplies) | Glossy swirls (unpredictable) | Moderate (oily hands) | 15–20 min | Not really |
| Tie-Dye (Rubber Band) | Moderate | Simple stripes | Moderate | Boiling + cooling | Moderate |
Looking at this table, you can see why the traditional method has survived for generations. It’s just right—easy, reliable, low mess. The trendy methods are pretty when they work, but they require more patience and forgiveness for things going sideways. Both are valid. You just need to know what you’re signing up for.
What I’ve Learned From Doing Both
Here are the real lessons from years of experimenting:
Color intensity matters more than you think. If you want DEEP color with the traditional method, use more food coloring drops and hotter water. If you want pale pastels, use fewer drops and cooler water. The ice-dye method can’t give you intense solid colors the way the traditional method can—the patterns are pretty but less saturated.
Boiling eggs before dyeing changes everything. I used to dye raw eggs (trying ice-dye one year with raw eggs—don’t). Boiling them first (the night before), letting them cool completely, then dyeing them hot means the food coloring grips the surface better. The difference is noticeable. Cooler dye, worse color. Warmer dye, better color. But be careful—too hot and you can crack the shells.
Food coloring stains hands like nobody’s business. Just accept it. Red and blue coloring will turn your hands for a solid day. Wear rubber gloves, or just plan on looking like you’ve been hands-deep in a art project. After one session with the boys, we had purple hands for dinner. Worth it, but real.
Muted colors are trending for a reason. Instagram is full of sage green, soft blue, dusty rose eggs right now. These come from fewer coloring drops or mixing colors (blue + red = purple, but a softer purple if you use less of each). If you want that trendy muted palette, use less coloring than I mentioned. You’ll get pastel-beautiful instead of jewel-tone-bold.
What Went Wrong — So You Don’t Repeat My Mistakes
I’ve had plenty of egg-dyeing failures. Here’s what taught me the most:
The year everything turned brown. I used the traditional method but mixed up my food coloring bottles. What I thought was red was actually food coloring that had separated (the bottle was old). What I thought was blue was murky at best. Mixed together in the dye water, every egg turned muddy brown. Lesson: check your food coloring before you start. Old bottles separate and don’t work right.
The time I used cold water by accident. I got distracted (Mason had knocked something over) and came back to find the water had cooled. Cold water + food coloring = very pale eggs. I had to redye them in fresh hot water. Lesson: water temperature actually matters. Don’t skip it.
The year Wyatt knocked the dye pot. Purple dye everywhere. Counter, floor, his clothes, my apron. Food coloring on light fabrics is permanent. Plan for spills. Do this over a dark surface or outside if possible. And definitely supervise kids around the dye pots.
The ice-dye experiment that turned everything lopsided. I was trying to make watercolor effects and got beautiful color on one side of each egg and nothing on the other. The ice melted unevenly. Lesson: ice-dye is pretty when it works, but “when it works” is the key phrase.
Safety Notes — Real Talk About Food Coloring
Food coloring is food-safe, but that doesn’t mean it goes everywhere. Here’s what I’ve learned from mistakes:
On kids’ hands: Food coloring is fine. It washes off skin eventually (usually by the next day). Let them dye with their hands if they want—it’s part of the fun and the memory. Just maybe not right before a white-shirt event. This managed clutter of purple hands and dyed aprons? That’s Easter morning looking real.
On clothes: Food coloring stains permanently. Don’t dye eggs in your Sunday clothes. Cover your work surface. And if you have kids with egg allergies, avoid the whole situation—you’re not actually eating these eggs, so there’s no allergy risk, but some families prefer to skip it anyway.
Hot water safety: This is the only real concern. If you have very small kids, handle the hot water yourself. Water hot enough to take dye well can burn, so keep kids at a safe distance from the dye cups.
What’s food-safe: The eggs themselves are food-safe because food coloring is food-safe. But if you use non-food dyes (craft coloring, certain markers), eggs aren’t edible. Stick with food coloring for eggs you might eat. Use craft supplies for eggs that are purely decorative.
After Dyeing — What Do You Actually Do With Them?
You’ve spent an hour making these beautiful eggs. Now what?
Hide them in a hunt: Most of mine go straight to the Easter egg hunt hiding spots. That’s their purpose. They get found, emptied of candy (or not—some just have plastic eggs), and then they sit in baskets being compared and counted. The hunt itself is the point. The eggs are just the vehicle.
Display them: If you made them beautiful (ice-dye, marble), you might keep a few in a bowl on the table or in a basket as decoration. They’re gorgeous, and people want to admire them. Just know they’re going to get dusty and eventually crack or dry out. That’s not failure—that’s just time doing its thing.
Eat them: If you boiled them in food coloring and vinegar, they’re absolutely edible. You can peel them, salt them, and eat them just like regular hard-boiled eggs. Some years I save a few to use for deviled eggs or salads. The food coloring is completely safe. You might taste a faint hint of vinegar (depending on how long they sat), but it’s subtle.
Toss them: And honestly, some years I just toss them after the hunt. They’ve sat in baskets for a few days, the shells have cracked, and they’re not as pretty anymore. That’s okay. The point was the hunt, the process, the memory of doing it together. The eggs themselves are temporary.
The Real Wisdom Here
The way Nana Ruth always said, the best methods are the ones you’ll actually use. Traditional dyeing is reliable. It never fails. You get beautiful eggs with simple supplies and no special ordering. If you want something you can trust, that’s your method. Something warm, something reliable, something that shows up the same way every year.
The trendy methods (ice-dye, marble, tie-dye) are fun experiments. They’re Instagram-pretty when they work. They’re finicky, they require special supplies, and they don’t always look how you imagined. But if you have time and patience and you like the adventure of it, they’re worth trying.
Honestly? I do both. One batch traditional (reliable, deep colors, trustworthy), one batch trendy (experiment, enjoy the chaos, accept that some turn out messier than others). By the time the kids arrive on Easter morning, I have beautiful eggs and a good story about what went wrong with the ice-dye. That’s just right—a mix of reliable and pretty, planned and spontaneous, Nana Ruth’s way and the modern way.
Want the full 3-week Easter timeline? Get the free printable that includes a dyeing schedule plus the whole menu plan and shopping list. Join 2000+ families planning Easter together.
{
“@context”: “https://schema.org”,
“@type”: “HowTo”,
“name”: “How to Dye Easter Eggs: Nana Ruth’s Way vs. The TikTok Way”,
“description”: “Learn both traditional and trendy methods for dyeing Easter eggs, with honest comparison of ease, results, and mess level.”,
“totalTime”: “PT30M”,
“step”: [
{
“@type”: “HowToStep”,
“name”: “Gather Your Supplies”,
“text”: “For the traditional method: white vinegar, food coloring, hot water, small bowls, spoons, and hard-boiled eggs that have been cooled completely. Check your pantry first to make sure you have these basics.”,
“position”: 1
},
{
“@type”: “HowToStep”,
“name”: “Prepare the Dye Water”,
“text”: “Fill each cup about halfway with hot water (not boiling, but truly hot). Add 1 teaspoon of white vinegar per cup. The kitchen will smell sharp when it’s ready. Add 10-15 drops of food coloring to each cup, adding more drops if you want deeper color.”,
“position”: 2
},
{
“@type”: “HowToStep”,
“name”: “Prepare Your Eggs”,
“text”: “Boil eggs the night before and let them cool completely. Cold eggs take food coloring more evenly than warm eggs. You can slightly crack the shells intentionally—that’s not a mistake, it adds character.”,
“position”: 3
},
{
“@type”: “HowToStep”,
“name”: “Dye the Eggs”,
“text”: “Gently place cooled eggs in the dye water cups. After 5 minutes you’ll see color beginning to creep in. After 10-15 minutes you have finished eggs. Leave them longer (up to 30 minutes) for very deep, jewel-tone colors.”,
“position”: 4
},
{
“@type”: “HowToStep”,
“name”: “Decide on Method and Prepare”,
“text”: “Choose your approach: Traditional vinegar method (easy, reliable, 20-30 minutes total), ice-dye (unpredictable but watercolor-pretty), marble with oils (requires special supplies), or tie-dye with rubber bands (simple stripes). Know what you’re signing up for before you start.”,
“position”: 5
},
{
“@type”: “HowToStep”,
“name”: “Prevent Common Mistakes”,
“text”: “Use white vinegar only (not apple cider or balsamic). Check that your food coloring bottles haven’t separated from age. Keep water hot throughout the process. Protect your work surface and clothes—food coloring stains permanently.”,
“position”: 6
},
{
“@type”: “HowToStep”,
“name”: “Supervise Hot Water”,
“text”: “If you have very small children, handle the hot water yourself. Water hot enough to take dye well can burn. Keep children at a safe distance from dye cups while supervising their egg-dyeing fun.”,
“position”: 7
},
{
“@type”: “HowToStep”,
“name”: “Let Eggs Cool and Enjoy”,
“text”: “Once dyed, let eggs cool and dry naturally. Use them immediately for an egg hunt, display them as decoration, save them for deviled eggs, or set them aside to enjoy. The purpose and timeline are entirely yours.”,
“position”: 8
}
]
}
From My Easter Kitchen:
Want My Easter Egg-Dyeing Checklist?
I put together a complete Easter guide — with timelines, checklists, and my personal notes on what can be prepped ahead. It’s the same one I’m using at home. Drop your email and I’ll send it right over — free, of course.
— check back here!
More From Our Kitchen
If you liked this, you might also enjoy: