I found the recipe card wedged behind a stack of index cards in Nana Ruth’s old tin recipe box—the one that now lives on our kitchen counter, right next to the salt shaker and the ceramic rooster Clara painted in second grade. The card was yellow at the edges, the handwriting faded to a soft pencil ghost: “Lemon Icebox Pie.”
I showed it to Clara during one of those gray March afternoons when the Ohio winter is finally releasing its grip, but spring hasn’t quite arrived. She looked at that faded card like it was treasure. Which, I guess, it was.
“Mom, did Nana Ruth make this a lot?” Clara asked, turning the card carefully in her hands like it might disintegrate if she wasn’t gentle enough.
“I don’t remember her making it,” I admitted. “Maybe once when I was really small? But it’s here, so she must have loved it at some point.”
“No-bake,” Clara whispered, reading the faded instruction at the top. “It doesn’t need an oven at all.”
And that was it. That was the moment I knew this pie belonged to Clara. Because Clara loves precision without pressure. She loves the clean satisfaction of measuring and mixing and letting the fridge do the work. An icebox pie is exactly her speed—elegant, patient, and forgiving.
Easter was coming, and I’d already planned the ham and the sides. But dessert was Clara’s department this year. She took that recipe card to her room, studied it like homework, and came back with a plan: she’d make it with a pastel swirl on top, something pretty for the Easter table. Nana Ruth would have loved that—she always believed food should look as good as it tastes.
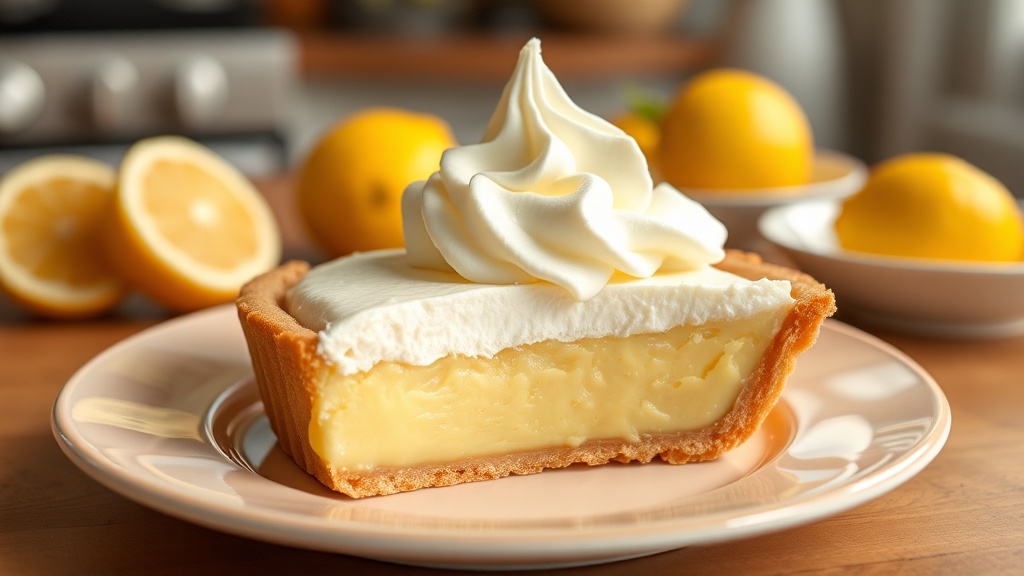
How to Make Clara’s Pastel Lemon Icebox Pie
Start with the graham cracker crust. Crush about a sleeve and a half of graham crackers until they’re fine crumbs—a zip-lock bag and a rolling pin work perfectly. Mix with melted butter and a tablespoon of sugar, press firmly into a 9-inch pie plate, and pop it in the fridge to set while you make the filling. You can also use a store-bought crust if time is short.
Make the lemon filling. Whisk together sweetened condensed milk, fresh lemon juice (you’ll need about 4-5 lemons), lemon zest, and egg yolks. The acid in the lemon juice thickens the condensed milk naturally—that’s the magic of an icebox pie. No baking required. It should be thick and creamy and smell like sunshine.
Add the pastel swirl. Clara’s signature touch: fold a little whipped cream into a portion of the filling, tint it with a tiny drop of food coloring (she uses lavender and soft pink), and swirl it through the top with a butter knife. It’s purely decorative, but it makes the pie look like spring.
Chill until firm. Pour the filling into the crust, add your swirl, and refrigerate for at least 4 hours—overnight is even better. The pie sets up beautifully in the cold. Top with fresh whipped cream and a little extra zest right before serving.
For another no-bake dessert with a more grown-up flavor, try my homemade Tiramisu — it has the same make-ahead magic.

Clara's Pastel Lemon Icebox Pie
Ingredients
For the Crust
- 2 cups graham cracker crumbs about 14-16 crackers
- 1/2 cup melted butter
- 2 tablespoons granulated sugar
For the Filling
- 1 14-ounce can sweetened condensed milk
- 8 ounces cream cheese softened
- zest of 2 large lemons
- 1/2 cup fresh lemon juice about 3-4 lemons
- 1 cup heavy whipping cream whipped to stiff peaks
- pinch salt
For the Topping
- 1/2 cup heavy whipping cream
- 1 tablespoon powdered sugar
- candied lemon slices for garnish, optional
Instructions
-
Crush graham crackers into fine crumbs. Mix with melted butter and sugar. Press firmly into a 9-inch pie pan. Refrigerate while making filling.
-
Beat softened cream cheese and sweetened condensed milk until smooth, about 2-3 minutes. Add lemon juice, zest, and salt — stir gently until combined.
-
In a separate bowl, whip heavy cream to stiff peaks. Gently fold into lemon mixture in two additions — don't deflate the airiness.
-
Pour filling into prepared crust and smooth top. Cover and refrigerate at least 4 hours, preferably overnight.
-
Before serving, whip remaining cream with powdered sugar. Spread over pie, top with candied lemon slices. Slice and serve cold.
Recipe Notes
Make this the day before — it actually improves overnight. Use fresh lemon juice only, not bottled. Make sure cream cheese is truly softened to avoid lumps. Keep refrigerated until serving.
Common Questions
What I Use for This Recipe
A couple things from my kitchen that make this one easier.

Pot pies, fruit pies, quiche. Glass so you can check the bottom crust without guessing.

Every frosting, every batter, every whipped cream. Light enough that my wrist survives a double batch.

No handles, more feel. Nana Ruth used one just like this. You can feel the dough better.
This post contains affiliate links. As an Amazon Associate, I earn from qualifying purchases at no extra cost to you. I only recommend tools I actually use. See all my kitchen picks