Sunday dinners in our kitchen have a smell that has nothing to do with perfume or candles. It’s the butter in the pot first thing—foaming, starting to turn golden, filling the whole house with something warm and specific. It’s the onions turning translucent. It’s beef browning hard in that heat, developing the kind of deep brown that can’t be rushed. And somewhere in that cooking process, Duke finds me at the stove with his golden head at my elbow, having learned long ago that Sunday is the day things take time.
I want to share this pot roast recipe because it’s what we come back to. Not because it’s complicated, but because it’s the opposite. It’s the kind of recipe that works whether I’m cooking for a regular Sunday or waiting for Jake to get home from a long rotation, and it teaches patience without any lectures involved. That part matters.
My grandmother made pot roast every Sunday without fail, and I spent my childhood watching her from a stool in her kitchen. She never used a recipe card—just her hands and her sense of the meat, the vegetables, the time. When I got married and moved into our first small house in rural Ohio, I called her almost every other week asking questions about timing and temperature. She’d laugh and say, “Maggie, you’ll know when it’s ready. Trust your nose and your patience.”
What made her pot roast the best wasn’t any secret ingredient. It was the way she treated time. Time wasn’t something to speed up or cut short. Time was the ingredient that made the meat tender, made the onions caramel, made the whole house smell like home.
I make this pot roast now, and I see my kids learning. Wyatt finally understands why we don’t rush it. Mason and Clara set the table without being asked when they catch the smell. Jake comes home from rotations and the pot is already there, waiting, like a form of grace.
Around two and a half hours in, Wyatt came back to the kitchen. He’d been drawing at the table—the oven, the pot, me standing over it. He’d written something in big letters across the top of the paper: PATIENCE ROAST. He was dead serious about it. He held it up to the window where the afternoon light hit it, and I felt something catch in my chest—not because he’d named the dish after what he was learning, but because he was learning it, right there in real time. That picture is still on the fridge.
How to Make Maggie’s Sunday Pot Roast
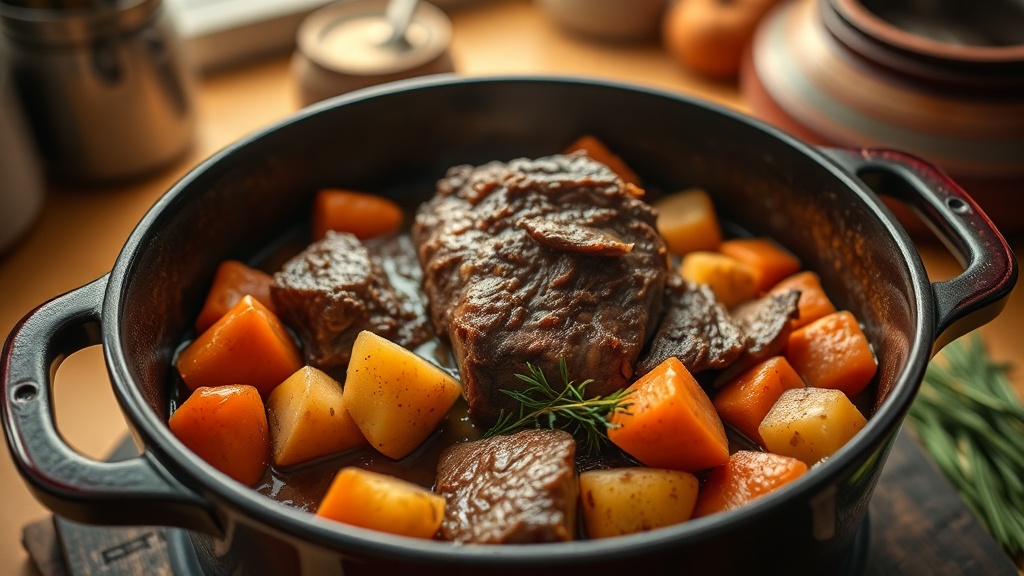
Start with the sear. Pat the chuck roast dry, season it generously with salt and pepper, and get your Dutch oven screaming hot with a tablespoon of oil. Brown the roast on every side until it develops a deep, dark crust—this is where half your flavor lives. Don’t rush this part. Three to four minutes per side, minimum.
Build the base. Remove the roast and cook your onions, carrots, and celery in the same pot until the onions are soft and golden. Add garlic, tomato paste, and a splash of red wine or beef broth to deglaze. Scrape up every brown bit from the bottom—that’s liquid gold.
Low and slow. Nestle the roast back in, add enough broth to come halfway up the meat, toss in your herbs (thyme, rosemary, bay leaf), cover, and let the oven do the rest at 300°F for about three hours. The house will smell incredible by hour two. By hour three, the meat will fall apart at a spoon’s touch.
Finish and serve. Add potatoes and carrots for the last 45 minutes if you want them in the pot. Let the roast rest for ten minutes before pulling it apart. Spoon the braising liquid over everything. Serve with crusty bread to soak up every drop.
For more ideas on stretching your grocery budget, check out my guide to feeding a family of five on a budget — it’s full of the kind of practical tips that actually work.

Maggie's Sunday Pot Roast
Ingredients
For the Roast
- 1 boneless chuck roast (3-4 pounds) well-marbled
- 2 tablespoons vegetable oil
- 1 large yellow onion, quartered
- 4 cloves garlic, smashed
- 1.5 pounds Yukon Gold potatoes, cut into 2-inch chunks leave skin on
- 4 large carrots, peeled and cut into thick rounds
- 3 stalks celery, cut into 2-inch pieces
- 2 cups beef broth low-sodium
- 1 tablespoon tomato paste
- 2 sprigs fresh rosemary or 1 tsp dried
- 2 sprigs fresh thyme or 1/2 tsp dried
- 1 bay leaf
- salt and black pepper to taste
- 1 tablespoon Worcestershire sauce optional
Instructions
-
Take the chuck roast out of the fridge 30 minutes before cooking. Pat dry with paper towels and season generously on all sides with salt and pepper.
-
Preheat oven to 325°F. Heat vegetable oil in a large Dutch oven over medium-high heat. Sear the roast for 4-5 minutes per side until deep brown on all sides (12-15 minutes total). Remove to a plate.
-
In the same pot, cook quartered onion for 2-3 minutes. Add smashed garlic and tomato paste, stirring for 1 minute. Pour in beef broth and scrape up the brown bits from the bottom (deglazing). Add Worcestershire sauce if using.
-
Nestle the seared roast back into the pot. Tuck rosemary, thyme, and bay leaf around it. The broth should come about halfway up the sides. Put the lid on and place in the middle rack of the oven.
-
After 2 hours, open the Dutch oven carefully and add potatoes, carrots, and celery around the roast. Replace the lid and return to the oven for another 1 to 1.5 hours.
-
The roast is done when it falls apart easily with a fork (about 3 to 3.5 hours total). Remove from oven and let rest with lid on for 10 minutes. Remove bay leaf and herb stems.
-
Transfer the roast to a cutting board or pull apart in the pot. Arrange vegetables on a platter, spoon braising liquid over everything, and serve with crusty bread.
Recipe Notes
Chuck roast is the essential cut — don't substitute with a leaner cut. The fat and connective tissue break down during braising. Leftovers make incredible sandwiches — shred the meat, warm in braising liquid, pile on crusty bread.
Common Questions
What I Use for This Recipe
A couple things from my kitchen that make this one easier.

For every stew, pot roast, and soup that needs low-and-slow love. The pot I reach for on Sundays.

Stop guessing. Best twelve dollars I ever spent on my kitchen.

No more sticky fingers from mincing. Press, rinse, done. The kids even use it for garlic bread night.
This post contains affiliate links. As an Amazon Associate, I earn from qualifying purchases at no extra cost to you. I only recommend tools I actually use. See all my kitchen picks